

Complete Guide to Setup SSH Keys for Github (in Linux)
How to not Enter A Password and Still Be Safe


I use 2FA wherever I can. One of them is Github. However, the problem with 2FA, at least for Github, is that you have to get and use your personal access token for pushing to your repository on Github instead of your password. Well, this makes sense since the ability to access, read and write to your repository must have a security level to a similar extent to simply logging in Github website, yet personal access token is just too long, you can't memorize it and you need to take a note somewhere so that you can copy and paste each time. However, HTTPS is not the only way you can push to your repository. SSH is one of them and it is safer to use.
SSH keys are located in your computer, which means your computer is the key to push to or pull from your repository. That also means any other machine will not be able to push to your repository. This is a great scenario for companies where they require access to the repository only on company machines. Instead of providing each employee credentials, you set it up on your company machines.
SSH keys also can be passwordless unless you define one. You do not have to write your password each time you push to the repository.
As to how to set it up, there are many great documentations, StackExchange answers or blog posts out there. In this post, I will try to provide a complete guide to set up SSH keys for your Github account.
Step 1: Generating SSH Key
This step can be also followed on Github's own documentation. The documentation itself tells you what to do but does not go into details as to why. I will explain it.
Firstly, you should create a new SSH key by doing below:
ssh-keygen -t ed25519 -C "your_email@example.com"
Change your email with your own email. The email you have used to register to Github is probably the best, otherwise you may have permission problems. Also, in this command, I use ed25519 as a public key cryptography algorithm. There are also other algorithms as well such as RSA, but since Github recommends to use it, we better use it as well.
When you run this command, you will get an interactive session, asking you:
Enter a file in which to save the key (/home/you/.ssh/id_ed25519):
This part is important and is up to your choice. If you leave it as is, it will automatically find the key and use it when you try to log in with your SSH to Github (which is every git push), which is convenient for maybe some of us.
However, having different keys for different hosts also makes sense. If you use (or will use) SSH on a different service, then creating and grouping with different names under ~/.ssh is a good idea. Using the same key for different services is similar to using the same key for your all houses. If the key gets somehow stolen, then all your stuff gets gone for sure. The catch is, if you rename your key, it will not be automatically discovered by SSH. So you will have to add your key to your agent each time you log in, which I will discuss later on.
If you have chosen the name, also you should be aware of the fact that you need to enter full path to the question. If you enter only the file name, then it gets created on the current working directory.
Step 2: Setting Up SSH Agent
We need to start ssh-agent and register our key in there so that whenever we git push, Git will be able to know to use SSH key.
In the Github's documentation above, it tells you to spawn ssh-agent process, yet the problem is that this process only lasts as long as your computer runs. When you restart, you need to start ssh-agent again.
However, in Linux, we have systemctl, a service manager that will spawn processes on boot or login. Luckily, our hero lightsing provides us a way to register ssh-agent as systemctl service so it can run on each log in automatically.
Firstly, you should know that SSH service is user-scoped. We have our keys under our home directory, so it is reasonable to register this service as user, which will run when we log in to our user (not when we boot up). In order to do that, we need to create the config directory for systemctl as seen below:
mkdir -p ~/.config/systemd/user/
Then, we will create ssh-agent.service file in there to spawn ssh-agent process when we log in. In this step, you can use whatever text editor you'd like, or create it with the default one like below:
touch ~/.config/systemd/user/ssh-agent.service
xdg-open ~/.config/systemd/user/ssh-agent.service
Paste below, save and close:
[Unit]
Description=SSH key agent

[Service]
Type=simple
Environment=SSH_AUTH_SOCK=%t/ssh-agent.socket
ExecStart=/usr/bin/ssh-agent -D -a $SSH_AUTH_SOCK

[Install]
WantedBy=default.target
This is basically a service file which describes to spawn ssh-agent and use socket file to communicate with other processes like Git in this case.
However, if you recognize in the service file, we also have SSH_AUTH_SOCK environment variable so we need to set it up so that ssh-agent can recognize it when it launches. In order to do that:
touch ~/.pam_environment
xdg-open ~/.pam_environment
And define the variable in that file, save and close:
SSH_AUTH_SOCK DEFAULT="${XDG_RUNTIME_DIR}/ssh-agent.socket"
Now we need to activate ssh-agent on boot is to enable it on systemctl and start it:
systemctl --user enable ssh-agent
systemctl --user start ssh-agent
--user flag tells this is a user-scoped service, which will spawn when your user logs in in your machine. enable is a subcommand telling "Start this service whenever I log in." and start is a subcommand telling "Start this service right away.".
You can check the status of your service by doing:
systemctl --user status ssh-agent
This should say "active (running)".
The next thing we should do is to tell ssh-agent to use our keys when we use Git. To do that, we need to add some line to ~/.ssh/config file. Luckily, we can do it in one line in terminal:
echo 'AddKeysToAgent yes' >> ~/.ssh/config
Also, we better set the permissions for ~/.ssh/config file to tell that my user owns that file. To do that:
chmod 600 ~/.ssh/config
Step 3: Setting Up Github to Use SSH Key
Github's documentation also has this already covered. I will try to explain even further.
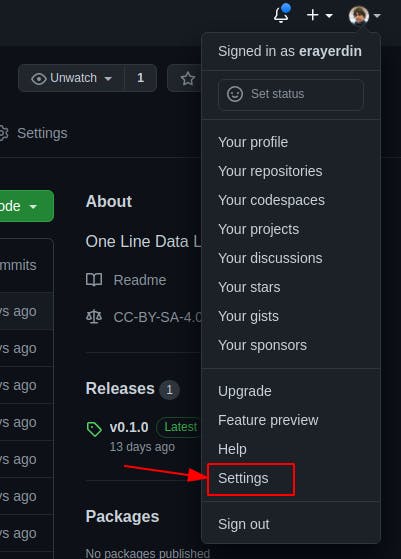
First, you should login to your Github account and head to settings page:
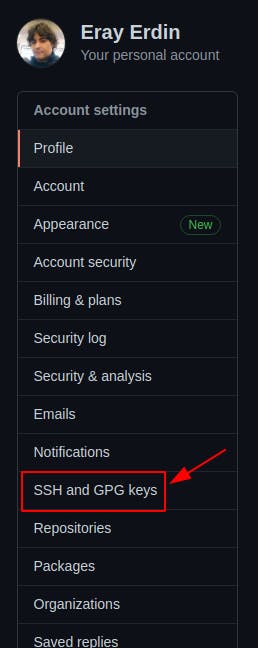
Then, you should go to "SSH and GPG Keys" page:
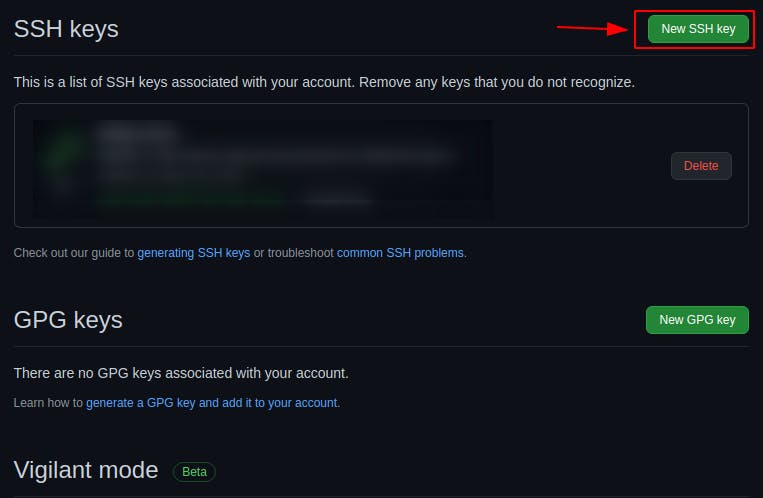
Then you click "New SSH Key" button:
You should see a form as below:
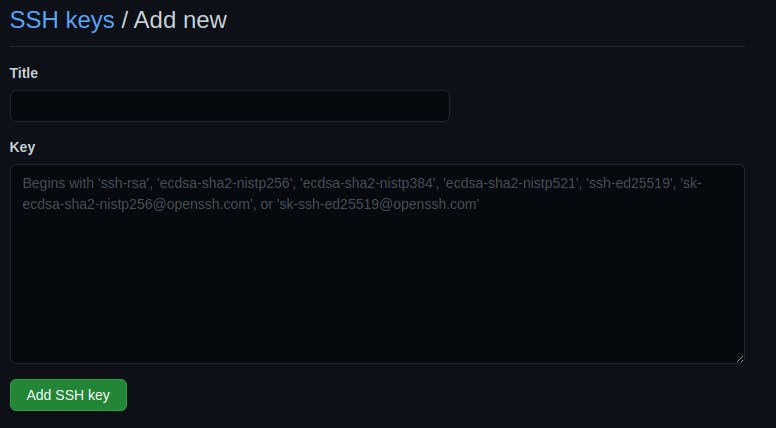
In this form, name can be whatever you'd like, and can be human-readable. Since my SSH key is github_homemachine, I will call it "Github Home Machine" in here.
In the Key input, you should paste the content of your public key you have created under ~/.shh directory. Remember, though, you should paste your public key, which ends with pub extension. Then hit save.
Step 4: Testing SSH Key
You can test if you are authenticated on github.com without actually pushing or pulling with Git. All you need to do is:
ssh git@github.com -v
Almost near the end, you should see "Hi erayerdin! You've successfully authenticated, but GitHub does not provide shell access.", which is a good sign.
Step 5: Using SSH Key
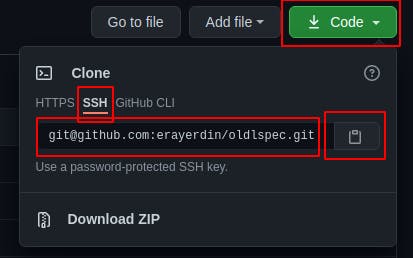
When you complete this setup, SSH URL will be the default in Github when you click "Code" button on any repository's home page.
You should use this in your projects.
How to Use On a New Project
You should copy the SSH link provided by "Code" button on repository's home page. cd into your local repository and add it as such:
git remote add origin git@github.com:username/reponame.git
How to Change Existing Repository to SSH Key
First, you need to remove origin from your local repository. cd into there and do:
git remote remove origin
Then, just like a new project, add your SSH URL:
git remote add origin git@github.com:username/reponame.git
This is how you setup SSH with your Github account, which is a safer way and will make it easier to access a repository at the end of the day. Hope this post also helped you.
Troubleshooting
It was working, but now it says "Permission denied" when I try to push my code.
The problem is probably your key's name being not one of defaults. There are two solutions to this: (i) either rename your key to one of SSH defaults so it can be detected automatically (ii) or add your key to the agent each time you restart your computer (yes, the problem was you restarted your computer so your SSH agent got reset).
To apply the first solution, just go into ~/.ssh and rename your private and public key to id_ed25519 and id_25519.pub. This solution is convenient if you have only one SSH service and that is Github. Or you can use the same key multiple times but this arises security concerns.
To apply the second solution, just do ssh-add ~/.ssh/my_key_name each time you log in or restart your machine. With this solution, you can use different keys under different names with different services using SSH, which is more secure than the first solution but, as I've said, requires this extra step on each time you reboot your machine.